Getting started with SVG
What is SVG?
SVG stands for Scalable Vector Graphics.
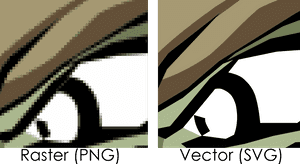
A SVG file is a vector image file format. Vector Graphics are based on mathematical formulas that define geometric primitives such as polygons, lines, curves, circles and rectangles.
Being “Scalable” means that the viewer can scale the SVG image up and down in size without loss of quality. This is possible because the graphics are defined as numbers instead of pixels.
PNG, GIF, and JPG are raster formats. Raster files are made of pixels, or single points of colour. They appear blurry when scaled upwards and on higher resolution screens.

How to include a SVG element ?
You can embed an SVG image in an HTML file in severals ways:
-
Using an img element
<img src="happy.svg"> -
Using a svg element
<body> <svg> …. </svg> </body> -
Using the SVG image as the background image(via CSS)
div {
 background-image: url(happy.svg’);
 background-size: 100px 100px;
}
How to create a SVG element?
We are going to create a happy face, but first, it’s important to understand the Viewport Coordinate System.
In the SVG coordinate system the point x= 0 , y= 0 is the upper left corner. As “y” increases in SVG, the points, shapes move down.
1. Creating our first SVG element
The first step is to use the <svg> element. The svg element is a container that defines a new coordinate system and viewport. The viewport is the visible area of the SVG image. You specify the size of the viewport using the width and height attributes of the svg element. If you do not specify any units inside the width and height attributes, the units are assumed to be pixels.
<svg xlmns=”http://www.w3.org/2000/svg”   height="300" width="300" viewBox=”0 0 300 300”>

</svg>
The svg has the following attributes:
xmlns: It’s only required on the outermost svg element of SVG documents. Specifying SVG Namespace , we need to tell the browser that we are going to be using a different version of XML, with non-HTML tags..height: The displayed height of the rectangular viewport.width: The displayed width of the rectangular viewport.
2. Drawing our first circle
SVG has some predefined shape elements. The <circle> tag allows us to draw circles on our SVG canvas.
<circle cx="150" cy="150" r="150" fill="yellow" />
The cx and cy attributes define the x and y coordinates of the center of the circle. If cx and cy are omitted, the circle’s center is set to (0,0).
The r attribute defines the radius of the circle.
The fill attribute defines the color of the shape inside its outline.
3. Adding a second and third circle
In the same way, we are going to create a second and third smaller circle, but these will have a black background.
<circle cx="100" cy="100" r="15" fill="black"/>
<circle cx="200" cy="100" r="15" fill="black"/>
4. Adding a path
Finally, we are going to make the mouth of our happy face with a path. The <path>element can be used to create lines, curves, arcs and more.
The shape of a <path> element is defined by one parameter: d. The d attribute contains a series of commands and parameters used by those commands. In our example we are going to use the following commands:
M(Move to): The “Move To” command appears at the beginning of paths to specify where the drawing should start. It takes two parameters, a coordinate (x) and coordinate (y) to move to.Q(Quadratic bezier curve): The quadratic curve called with Q, takes two parameters: the control point and the end point of the curve.
All of the commands come in two variants. An uppercase letter specifies absolute coordinates on the page, and a lowercase letter specifies relative coordinates
The following example creates a curve, where the start point is (75, 200), the control point is (150, 260) and the end point is (225,200).
<path d="M 75 200 Q 150 260 225 200" stroke="black" stroke-width="4" fill="none"/>
The stroke property defines the color of the line.
The stroke-width property defines the thickness of the line
Here is finally our svg element:
<svg  height="300" width="300" >
   <circle cx="150" cy="150" r="150" fill="yellow" fill-opacity="0.3"/>
    <circle cx="100" cy="100" r="15" fill="black"/>
   <circle cx="200" cy="100" r="15" fill="black"/>
   <path d="M 75 200 Q 150 260 225 200" stroke="black"  stroke-width="4" fill="none"/>
</svg>
Posted by Ana Mafla on 2020-08-1
